Experimental Stress Analysis (ESA) is the analysis of the mechanical stress state in materials, which is performed through experiments using strain gauge measurements. Learn the existing types of stress, their origin and states, or how to determine stress from measured strains by reading about it below.
Stress is defined as the physical response (deformation) in materials caused by force. It usually occurs as a result of an applied force (mechanical stress) that cause the material to deform, but it is also often due to the effects of force within a material or larger system.
Stresses are subdivided as follows:
Further, stresses pertaining to origin are categorized as normal and shear stresses (when considering the strength of materials, the type of stress is of interest irrespective of its cause). In addition, stresses can be subdivided according to the states described above.
Unlike other stresses named after their origin, e.g., bending stress, torsion stress, etc., – tensile stress (positive) and compressive stress (negative) occur without any external forces being involved. These comprise normal and shear stresses.
Residual stress (or inherent stress) can occur due to the internal effects of force, e.g.: from non-uniform volume changes in heat-treated parts during the hardening of steel, by non-uniform cooling of cast or injection-molded metal or plastic objects, with welded or forged parts, through mechanical processing, and with larger objects, simply from the effect of their own weight.
Thermal stress is a type of residual stress that occurs in systems, where parts with different thermal expansions are joined together such that free thermal expansion is prevented. It can also occur as a result of non-uniform heating.
Residual and thermal stresses affect the material similar to loading stresses. They reduce the load-bearing capacity of the material owing to externally applied forces. Questions regarding the operational safety of structural parts can therefore only be answered adequately if the residual stresses are known quantitatively and qualitatively. The determination of these stresses is only possible with normal practical methods when they are "released" and the degree of resilient relaxation exhibited by the material in the non-stressed state is measured. The release of these stresses can take place in various ways, such as the hole drilling method or ring core method.
Stress states are subdivided as follows:
Strain measurements are restricted because of necessity to the accessible surfaces of the structural parts and can consequently only give information about the stress state at the component's surface. Whereas uniaxial and planar stress states can be analyzed relatively simply using strain measurement techniques, in particular using strain gauges. Three-dimensional stress states present problems since the required measurements along the third axis, i.e., inside the object, are usually not possible to obtain.
However, in a three-dimensional body, which is stressed by external forces, the maximum stress occurs at the surface! (Exception: Hertz effect problems) For the designer, who is usually only interested in the maximum stresses, the determination of the stresses at the surface is sufficient. The internal processes are of lesser significance.
Three-dimensional stress states can only be analyzed using strain measurements if the strain can be measured along the third axis, i.e. in the object's depth. This is found for example in model measuring techniques where strain gauges can be cast into plastic models. This is also possible in civil engineering where strain measuring equipment can be embedded in the concrete during pouring.
Mechanical stresses are not accessible for direct measurement. X-ray techniques form an exception to this where the material stresses in the microscopic range can be determined from distortions in the crystal lattice structure, i.e. from the relative changes in the interatomic separation. The process is restricted to layers near the surface of about 5 to 15 μm depth.
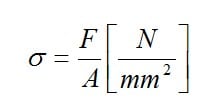
Stresses are calculated either according to the theory of materials' strength or using the strain gauge measurements. The latter method is based on Hooke's Law. The mechanical stress is expressed by the quotient of the force F and the cross-sectional area A of the stressed material:

From fatigue testing of an aircraft wing, strain analysis of a printed circuit board, to structural monitoring of a bridge or residual stress measurement, stress analysis strain gauges offer both high performance and cost effectiveness. HBK strain gauges for experimental stress analysis are available in four standard series of high-quality strain gauges and a comprehensive range of strain gauges for special applications such as crack propagation.

From fatigue testing of an aircraft wing, strain analysis of a printed circuit board, to structural monitoring of a bridge or residual stress measurement, HBK strain gauges for experimental stress analysis are used to determine the level of stress on a material.


